Spring WebClient
WebClient 는 스프링이 제공하는 말 그대로 client 로서의 역할을 하기 위한 모듈이다.
동기 API 요청을 처리할때 사용한다.
RestTemplate vs WebClient
RestTemplate (Spring Framework 6.0.13 API)
postForLocation Create a new resource by POSTing the given object to the URI template, and returns the value of the Location header. This header typically indicates where the new resource is stored. URI Template variables are expanded using the given URI v
docs.spring.io
이전에는 동기 api 요청을 처리할때 RestTemplate 을 사용했는데 위 doc를 보면 아래와 같이 spring5.0 부터는 webclient 사용을 권장하고 있다.
NOTE: As of 5.0 this class is in maintenance mode, with only minor requests for changes and bugs to be accepted going forward. Please, consider using the org.springframework.web.reactive.client.WebClient which has a more modern API and supports sync, async, and streaming scenarios.
그렇다면 둘의 차이점은 무엇이고 왜 RestTemplate 은 더이상 지원하지 않는 것일까.
RestTemplate
- 멀티 쓰레드
- 쓰레드 풀을 미리 일정갯수 만들어 놓고 요청이 오면 놀고 있는 쓰레드에 일을 할당하고 쓰레드는 producer,worker 에게 일을 맡긴다.
- Blocking 방식
- 각 쓰레드는 producer,woker 이 일을 끝내고 결과를 반환할때까지 다른 일을 하지 못한다.
WebClient
- 싱글 쓰레드
- 요청은 Event loop 라는 곳에 등록되고 Event loop 는 각 요청을 바로바로 producer,worker 에게 넘긴다.
- Non-Blocking 방식
- Event loop 는 요청을 producer,worker 에게 바로 넘겨버리고 다음 요청을 받을수 있다.
- producer,worker 가 일을 끝내고 리턴하면 요청자에게 리턴한다.
RestTemplate 의 문제는 쓰레드풀의 쓰레드들이 모두 일 중일때 일어난다.
쓰레드풀의 쓰레드들이 모두 일중일때 요청이오면 대기할수 밖에 없어진다.
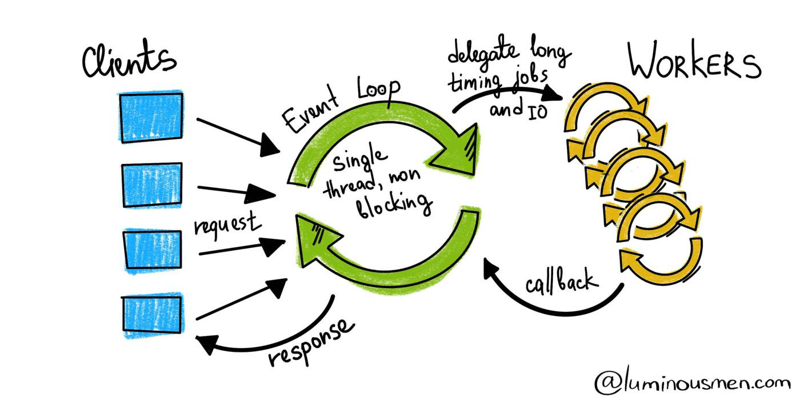
반면 webclient 는 중간의 event loop 가 바로 producer,worker 에게 일을 넘기고,
그들에게 반환받은 일들의 완료에 반응하여 요청자에게 반환할수 있도록 설계되어 있다.
사용방법
https://docs.spring.io/spring-framework/reference/web/webflux-webclient.html
WebClient :: Spring Framework
Spring WebFlux includes a client to perform HTTP requests with. WebClient has a functional, fluent API based on Reactor, see Reactive Libraries, which enables declarative composition of asynchronous logic without the need to deal with threads or concurrenc
docs.spring.io
스프링 라이브러리가 제공하는 메소드를 보면 정말 쉽게 사용할수 있게 만드는것 같다.
이전에 google oauth 를 구현하면서 사용한 webclient 코드를 먼저 보자.
(https://tose33.tistory.com/1303)
// WebClient 에 googleOAuthRequest 담아서 요청 보내고 응답 받는다
WebClient webClient = WebClient.builder()
        .baseUrl(googleAuthUrl) // api 요청 base path
        .build();

ResponseEntity<GoogleLoginResponse> apiResponse = webClient.post().uri(uriBuilder -> uriBuilder.path("/token").build())
        .bodyValue(googleOAuthRequest)
        .header("from", "client")
        .retrieve()
        .toEntity(GoogleLoginResponse.class) // GoogleLoginResponse 로 받는다
        .block();
그냥 보기만 해도 무슨일을 하는지 알수 있을 정도로 명료하다.
크게 두 단계가 있는데 WebClient를 create 하고,
Response 추출을 위한 retrieve 가 있다.
create
1. webclient 의 static factory method 로 단순하게 아래와 같이 만들수도 있고
// static factory 로 생성
WebClient.create();
2. WebClient.builder 에 옵션을 부여해 만들수도 있다.
// WebClient.builder() 에 옵션을 부여해 생성
 WebClient webClient = WebClient.builder()
                .baseUrl(googleAuthUrl) // api 요청 base path
                .build();
retrieve()
response 를 어떤 방식으로 추출할지 결정한다.
ResponseEntity<GoogleLoginResponse> apiResponse = webClient.post().uri(uriBuilder -> uriBuilder.path("/token").build())
        .bodyValue(googleOAuthRequest)
        .header("from", "client")
        .retrieve()
        .toEntity(GoogleLoginResponse.class) // GoogleLoginResponse 로 받는다
        .block();